Wednesday, September 26, 2012

Gundam Heavyarms MG Review

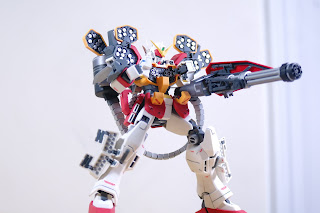
Finally I finished my 3rd MG so far. This is one of my favorite mobile suit in series after Deathscythe Hell. Fortunately, all the odds turned in my favor this time. I didn't had any errors this time just a smooth suave build. I really love how Bandai designed this kit. The missiles are separated from the shoulder for a smooth and easy paint job. The details are very good, just a little touch of gundam marker to highlight the every articulation of it. The building process is the same with Deathscythe Hell. Cut and clean the pieces, sort it out and paint. then panel lines, decals and top coat. It didn't took a while because some of the stock colors of the pieces are already good to my eyes, no need to paint it in my opinion.

The construction are excellent it can hold it's own weight without falling off. The few down side that I noticed is that the brace connecting wire between the tank behind his back pack are always falling off if you move the arms upward. What I did is I applied a little bit of super glue to the lock of the wire connector and luckily the problem is solved. And another one is the army knife, you cannot turn the whole arms straight while the army knife is attached the tip of the knife is blocking the shoulder if you did. So you need to turn the arms 90 degrees in order to attach it properly.

Nonetheless, if you're a big fan of Gundam Wing, you should definitely grab one. It's worth the money and I think this is the most painless, problem free build among the three.

*credits to my girlfriend Hazel for this amazing gift.*

Here's some pictures.


For the next build, I'm thinking to get a Sandrock and paint it as the OVA version or buy a 00 Raiser.

Thanks for reading, I'll keep you guys updated as soon as possible.

Sunday, September 23, 2012

Gundam Heavyarms Update

It's been a while since I finished D-Hell. I admit, it's pretty tiring to build it so I decided to take a break. I started working on Heavyarms last Tuesday, and for some reasons I can't finished it within the week yet. I easily get lazy to think that I'm about only 40% so far. The pieces are way too small especially the missiles and seems much complicated than I thought. I probably going to finish it hopefully next week because It's going to be busy at work starting tomorrow.

Sunday, September 9, 2012

Gundam Deathscythe Hell 1/100 MG (Build Review)

The god of death has returned from Hell! After 5 days of building. He's here! Here's my review for this bad boy.

I used a different method this time. First, I cut and clean (sand) the pieces from the runners then build the inner frame of it. I don't want to paint the whole runner then re-paint it again after I clean the nub marks. I think it is a time consuming as well as waste of paint.

After I cleaned the pieces I put them in a ziplock bag sorting out per section. So that when I'm about to paint, I don't have to be confused if that piece belongs to a specific section or not. It is also easier to do it rather than sorting it out by color. And it saves time instead of referring to the manual again.


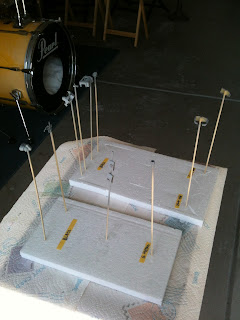
Once it is done, I began to paint the parts. I used Tamiya spray paint as always. For me I recommend Tamiya paint and I will explain later why. Here's the paint/materials colors that I've used.

-Silver leaf
-Italian Red
-Chrome Yellow
-Semi Gloss Black
-Light Gunmetal
-Primer (gray)
-Tamiya Masking tape 10mm


As you can see the picture above, I bought a Model Master bright yellow enamel paint because the Tamiya Camel Yellow is already out of stock at my nearest hobby store. And for some reason, I'm quite disappointed with it. One of the lessons learned, STAY AWAY FROM MODEL MASTER. They suck I used a primer to paint my V-fin but it seems like the paint is not adhering into the piece. And it sprays very thick as well. So what I did, after the paint dried I sand it down again but I accidentally broke his V fin. I'm like FFFUUUUU!!! but yeah, I bought a chrome yellow out of frustration and applied a thin layer of super glue on the broken fin, sand down again then paint.


After the problem is solved. I started painting the rest of the pieces.

I must say, This method is much faster to build. Simply because you already built the half of it which is the inner frame. It took me about 3 hours from building, panel lines and decals unlike the Wing Zero which is like 5-8 hours of building from scratch.


Then I sprayed a Mr. Hobby Super clear top coat flat to protect the base coat of the paint.

Finally, Here's the final product of my build. :D


That's it for now. Next project, Gundam Heavyarms.


Wednesday, September 5, 2012

Gundam Deathscythe Hell MG *Update*

I got my new Deathscythe Hell and Heavyarms EW ver. last week. And I also did some research for about a week on how to nail it better this time. I must say, there's a lot of good builders/modelers across the web. I stuffed myself with a lot of ideas and finally I finalized my strategy/method on how should I build it.


Okay, so I began building my 2nd Master Grade yesterday and I used a different approach this time. I decided not to paint the pieces while they're still on the runners, instead I cut and cleaned them first then placed them in a Ziplock bag sorting out per section like arms, head, body etc.. so that when I'm about to paint, I don't have to memorize each piece again.

I will use several spray paint by Tamiya some of them are:

- Silver leaf (TS-30)
- Light Gunmetal (TS-42)
- Italian Red (TS-8)
- Camel Yellow (TS-34)
- Semi Gloss Black (TS-29)
- Brilliant Orange (TS-56)
- Tamiya Primer (Gray)

I'm trying not to rush this time. I want this to be perfect as possible. I had some mistakes in my Wing Zero Custom before and I'm trying not to do the same errors again. So far I'm doing a pretty good job at it. I'll make a full review once I get this done.

Tuesday, September 4, 2012

Gundam Wing Zero Custom 1/100 scale Master Grade

Pre-build to post-build (3 days of progress). It's my first time to assemble a Master Grade. Kind of easy yet challenging especially on the panel lines. I had fun constructing this bad boy compared to my previous HG ones. 


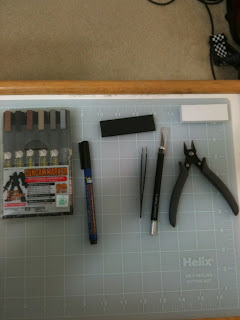
Tools needed:


-Sprue cutter
-Knife cutter
-Tweezers
-Sandpaper (400-600) grit
-Gundam Marker GM01 or GM02 for panel lines.
-Gundam Weathering marker
-Eraser


Building flowchart/steps:

-primer (if you want to paint the plates/runner)

-base coat (if you want to paint the plates/runner)

-cut and clean the parts.

-panel line

-detail (weathering)

-decals

-production

-top coat


I did the "lazy method" according to dannychoo's tutorial on this one because I don't have enough time to cut and clean the individual pieces and paint it one by one. So what I did is I just spray all the runner with primer first, then the base coat. Here's how it looks after spraying the primer.


I decided to paint just the blue part of it, the original color is too dark for my preference so I bought a Tamiya spray can which is the TS-44 (Brilliant Blue) and a Tamiya gray primer. As you can see below, It's already replaced by a different shade of blue. I'm impressed by the curing time of the Tamiya spray paints. It's already dried after 40 mins of spraying and left it for about a couple of hours just to make sure it's completely dried. But I prefer a full 24 hours of curing time to get the best results. (if you can wait) :D 


After the paint is completely dry, I already began to build it as I carefully follow the instructions included in the kit. I already put the panel lines as I build each sections. Trust me, it's much more easier to draw the lines while the piece is still on the runner or just after cutting it. 1 section alone together with the cleaning and putting the panel lines on the piece took me like 1-2 hours of building. It's pretty tiring but worth it.


If you accidentally draw unnecessary lines outside of the grooves, don't panic. that's where the eraser do it's job. Just simply erase the unwanted lines and VOILA! you're problem is over. Gundam Markers Ink can be easily erased by a pencil eraser that's why I recommend to use it instead of sharpies or any other marker.

I didn't used the weathering marker for this kit, for some reason it is very difficult to put weathering on it. It's either too much and they dry fast! It ruined my kit. But luckily I use Isopropyl Alcohol to remove it. and probably switching over to a pastel one like Tamiya.

The only downside on painting while the pieces are still on the runners, is that when you cut between the gate and pieces from the runner, the nub marks will reveal the original color of it. If that happens, you will have to sand it down to make it even and repaint the whole piece again which is a pain in the butt and time consuming as well.


Be careful on applying the dry decals. Make sure you taped it first with a ordinary invisible tape or masking tape on the desired section then apply pressure to it evenly until you see the decals are transferred to the plastic. Otherwise you're gonna mess up and cry. 


After several tiring hours of building I managed to get it done. and sprayed a top coat (matte) on it to give a realistic mobile suit look.  I am really satisfied after I saw the final production. His wings are pretty awesome. A huge kudos to Bandai for this one, engineering was outstanding. It looks pretty difficult at first because it has a lot of parts and pieces. But every penny is totally worth it.


That's about it. As of now I am currently working on Gundam Deathscythe Hell. I will use a different approach/method this time, and it will take a longer process to build compared to my wing zero custom. Anyway, I'll keep you guys updated.